Options
The Options tab lets you set basic domain settings. The tab consists of four sections: Type, Options, Unknown Accounts, Antispam
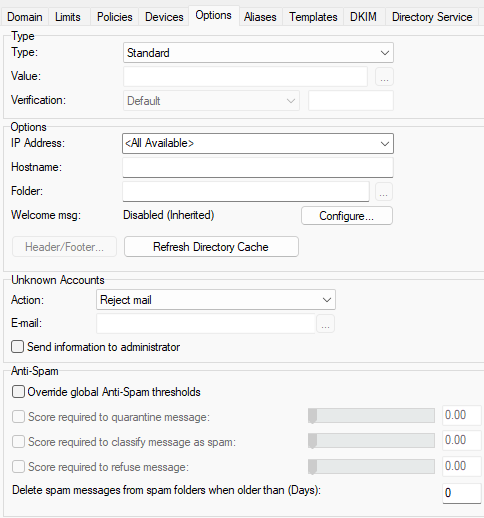
Figure. Domain level management: Options tab.
Options tab: Type section
In the Type section you can set the type of domain. You can choose Standard (most common), Domain alias, Backup domain, Distributed domain, or ETRN/ATRN queue domain type, enter Value, etc.
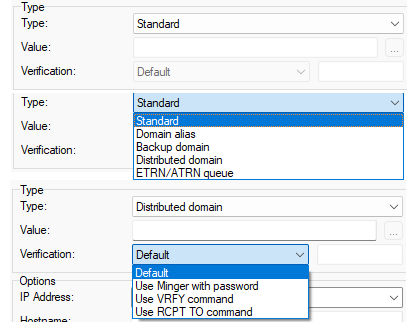
Figure. Options tab: Type section.
|
Field |
Description |
|---|---|
|
Type |
This specifies a standard domain with users who have separate mailboxes. This is the default domain type and probably the most commonly used. The Domain alias type is used to immediately forward any received messages to another domain. In the Value box, specify the domain where you want to forward the messages . Forwarding can only be done to local domains (i.e. on the same IceWarp Server). This domain is useful in case you have registered multiple combinations of a domain name but want all messages to be collected from one point. For example, if you own MyShop.com, MyShop.net, MyShop.org and you want all messages to go to MyShop.com:
Note: It is not recommended to create accounts in this type of domain. If you add an account, the mails sent to that account will not be forwarded. Note: For backwards compatibility reasons and for having possibility to define different rules for a domain alias, this option is still retained. To find additional information, go toAliases. The basic function of a backup domain is to accept messages and forward them immediately to another server. If the other server cannot be contacted then the messages are queued for delivery when the server is back online. This can be useful in three suggested scenarios. 1. Backup Server Serves as a backup to ensure that no messages are lost if your primary server is offline. Follow the steps below:
Now, if your main server is down for any reason, any remote connections should contact your backup server to deliver messages. When your main server is running correctly again, the backup domain will deliver all messages collected during the down-time. 2. Domain Gateway This allows you to have a server between your "real" server and the Internet. Follow the steps below:
Now, all messages sent to your company will be initially processed by your backup domain server. The backup domain server can do all the IceWarp Antivirus and Antispam processing. You get only those messages that you really want to receive on your server. For this scenario, quarantine is the only option. There are neither accounts, nor spam folders. You don't need to forward any spam reports to ensure the reports are not caught by antispam (this can be done e.g. through bypassing 127.0.0.1 from antispam/quarantine). 3. Migration Scenario This allows you to carry out a phased migration of users from one email server to IceWarp Server. Follow the steps below:
As soon as you create user accounts, they will migrate to the new server. Note: An important difference between the distributed domain and the backup domain is how they respond when they cannot connect to the receiving server. A backup domain saves the message and delivers it when the server is back online. A distributed domain issues a 4xx warning to the sending server, which then tries to sent the message again later. Note: If you create a user on a backup domain then any messages for this user will not be forwarded, but will be stored in that domain. Note: Domain aliases can be used. This, however, can cause inconsistency between the address used for verification and address used for delivery. Warning: Use the c_system_services_smtp_rewrite_backup_recipients API variable. If you set the value to false, the domain aliases used within email addresses will not be rewritten. If you set the value to true, the domain aliases will be changed to a domain name. The distributed domain is a popular solution for businesses with multiple locations. If you wish to distribute your IceWarp email servers around your locations, each with a group of your users, follow the steps below:
When a message is delivered to the receiving server, it will:
Important difference between a distributed domain and a backup domain is how they respond when they cannot connect to the receiving server:
Note: Distributed domains require recipient real time verification. The email will not be sent out if one of the destination servers entered in the Value field is inaccessible. In this case the user will get the "4xx – try again later" error. The email will be sent when the destination server with the appropriate user account is available. For WebClient, there is a work-around – use Bounce back messages for failed recipients (Administrator Options > Mail > General). Other option is to use backup domains. However, you lose the IM/VoIP functionality of the distributed scenario. Note: Antispam is not performed for external recipients
of distributed domains. This can be changed in API console. Enter C_AS_BypassDistributedDomain and set the value to 0. In this case
Antispam is performed if it is set for outgoing messages. This type of domain is used to hold all messages, which are collected by another mail server using the ETRN or ATRN SMTP Client commands. This type would usually be used by ISPs. Create one user account to allow the collecting server to log in and collect mail. Check the ETRN/ATRN account checkbox in the User > Options tab for this user. If a password is set for this user account, the collecting server must specify the password in the ATRN command. |
|
Value |
This option is available for all domains except the standard one. Multiple values can be specified in this field, separated by semicolons. Port values can also be specified by adding a colon and the port at the end of the host name. This can be useful if your ISP blocks standard ports. Syntax: [{domain}{:port};{domain}{:port}] Example: mydomain.com:81;194.148.0.1 Note: When you put more IPs separated by semicolon into the backup domain Value field, IceWarp Server will try to connect these IPs in the entered order. When the first IP fails, it will try to connect to second one, etc. However, there will be a delay caused by timeout when waiting for the first IP response. Connections are done in a queue, not in parallel. When the first IP succeeds, IceWarp Server will not try to connect the second one in any case. Warning: After some time of the first IP outage, there is no way how IceWarp Server could send emails to this IP when it is available again. Note: It is recommended to use host names here. Using of IP addresses could cause problems if you decide to change them.
Note: You can use the authentication as described in Use relay server). Note: In case the desired value is too long, use defined patterns (System > Advanced > Patterns tab) in this field. Use a pattern name in brackets: [pattern_name]. Note: This field is disabled for standard type domains. Although it is possible to access and edit it in WebAdmin, it does not change anything for this type. |
|
Verification |
Applies only to the Distributed domain and Backup domain types.
Note: For both domain types you can use the response cache. In this case the result of a performed query will be cached. Also, you don't need another connection to a remote server for the next query. |
Options tab: Options section
In the Options section you can enter IP Address, Hostname, Folder.
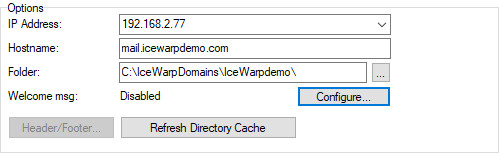
Figure. Options tab: Options section.
|
Field |
Description |
|---|---|
|
IP Address |
You can enter an IP address to bind this domain to it. The IP address is also used for authentication. If it is not set correctly then none of your users will be able to authenticate. Note: To bind the IP address for outgoing connections, you have to enable the Use domain IP address for outgoing connections option. See Domains. Note: To bind the IP address for logging in, set the
C_Accounts_Policies_Login_DisableDomainIPLogin
property to 0 using API console (File > API console...). |
|
Hostname |
Enter a domain hostname, which will be used for outgoing connections. This setting can be essential for domain identification by various AntiSpam technologies, including Greylisting, SPF and Intrusion Prevention. If you enter the hostname than the hostname entered in System > Services > Smart Discover tab > SMTP is bypassed. Note: This option can be used if you checked the Use domain hostname for outgoing connections checkbox (Domains & Accounts > Global Settings > Domains tab > Other) . |
|
The name of the domain folder used for all domain settings and user accounts directories. By default, the path to the domain folder is entered in the Mail path, System > Storage > Directories > Mail path This acts as a prefix and is added to the mailbox path for all newly created accounts (within this domain). Note: In case you have mailboxes with non-standard
mailbox paths in a domain, create the externaldirs.dat file with these paths and put it into
the IceWarp/config directory.
|
|
|
Header / Footer |
You can specify a domain header and footer. If the Header/Footer button is inactive, go to Mail > General > Advanced tab and check the Active checkbox in the Header/Footer section to enable it globally. Open the domain Header/Footer dialog to specify your header and footer information. If the domain header and footer are not defined, the global ones will be used. Find out more in the global Header/Footer settings. |
|
Refresh Directory Cache |
Files/folders copied into mailboxes will not appear to users unless the directory cache is updated. Click the button to do it. Note: If you copy files/folders via the internal (console) File manager, this action is not necessary. |
Options tab: Unknown accounts section
The Unknown Accounts section of the Options tab specifies how to handle messages that arrive for delivery to undefined accounts.
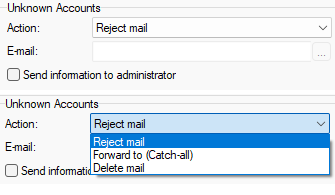
Figure. Options tab: Unknown accounts section.
|
Field |
Description |
|---|---|
|
Action |
Specifies what should be done with a message if it came to an account that does not exist on the server:
|
|
|
In this field you can specify the email address, which will collect all messages for nonexistent accounts if the Forward to (Catch-all) option is selected. You can enter multiple addresses separated by semicolons. Use the ... button to open a dialog where you can select accounts or groups (for more information seeSelect Accounts ). |
|
Send information to administrator |
If this box is checked, the administrator's account will receive a copy of any message sent to any account that does not exist. Note: This option applies only if Reject mail or Delete mail is selected in the Action field. |
Options tab: Antispam section
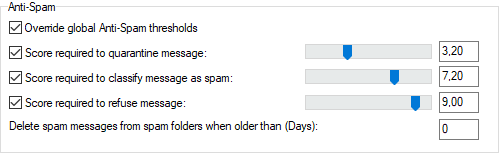
Figure. Options tab: Antispam section.
|
Field |
Description |
|---|---|
|
Override global Antispam thresholds |
Check the box if you want to use individual limits for this domain. |
|
Score required to quarantine message |
Check the box if you want to move a message to quarantine if the spam score of the message equals the selected value or is higher (Spam Scores Concept). Move the slider to change the value. Note: The Quarantine function must be enabled for this control to work. |
|
Score required to classify message as spam |
Check the box if you want to classify the message as spam if its spam score equals the selected value or is higher. Move the slider to change the value. |
|
Score required to refuse message |
Check the box if you want to delete/reject a message if its spam score equals the selected value or is higher. See Refuse message action in Antispam > Reference > Action for more details. Move the slider to change the value. |

