Step 4 – SmartDiscover
Outlook Sync is designed to work out of the box. SmartDiscover services help to retrieve necessary settings from the server and use them to connect the Outlook profile with the IceWarp account that is ready to work immediately. Enter your IceWarp email account and password. The SmartDiscover window consists of several fields you need to fill in and has several options you can select:
-
Email address and Password are the login credentials (IceWarp email account and password) you receive from your administrator.
-
Profile name is the name of the Outlook Sync profile that will be connected to your IceWarp account.
-
Groupware only profile if checked, determines that the profile will not be Regular profile but for the groupware synchronization only:
-
Regular profile synchronizes emails, as well as calendar, contacts, notes, and other groupware of two servers: Microsoft Outlook and IceWarp server. It is recommend in most cases.
-
Groupware only profile synchronizes only groupware and emails are not synchronized. It is suitable if you want to use Outlook POP3 account to access your mails, together with all possibilities of the IceWarp groupware services. In case you want to synchronize also the emails from IceWarp account, you will have to configure it in Outlook separately.
-
-
Configure manually skips SmartDiscover step. Installation wizard will not contact the server for configuration details.
-
Create profile if checked, creates a new Outlook SyncProfile. If unchecked, the Outlook Sync wizard just installs program files without creating a profile. However, you will see Outlook Sync add-in in the Outlook interface. With its help, you can later bind the IceWarp email account with the existing Outlook profile or create a new Outlook profile with the IceWarp account.
If you fill in your login credentials and do not check the Configure manually checkbox, the Outlook Sync installer wizard will contact your IceWarp server and load the configuration set by your administrator.
This configuration consists of services ports and security settings, and most importantly your license. If SmartDiscover service is not properly configured on the server, the installer fallbacks to the manual configuration where you need to fill in all required properties.
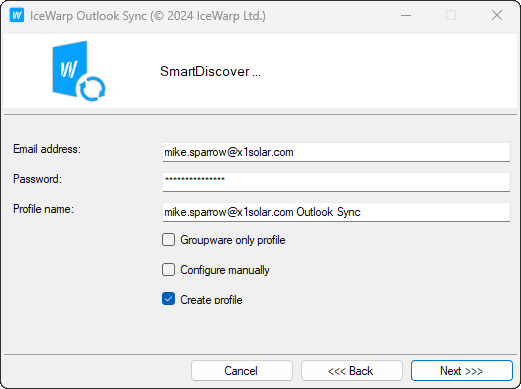
Figure. SmartDiscover.
Note: SmartDiscover always tries HTTPS for security reasons. To receive the settings, it attempts to contact four types of addresses that are constructed based on your domain, MX records and SRV records.
According to the specification, the SRV records must point to the secured port if the port is specified.
If Smart Discover fails, move to Step 5 to perform the manual configuration.

