Start a Conference
You can start a conference immediately or schedule it for a certain time.
-
To start a conference immediately, click Meet now, enter a name, enable preferred options and click Start.
-
To plan a future meeting, click Schedule a meeting. See Schedule a meeting.
Tip: We recommend to enable the recording automatically so you can watch it later in the History or share it with your colleagues. If you setup a password, it protects your conference from uninvited attendees and also protects the shared conference recording. See History of Recordings .
To start a conference, click New ![]() > Conference or Conferences
> Conference or Conferences ![]() and select Meet now.
and select Meet now.
/Start Meeting_316x252.png)
Figure. Starting a conference.
You can also create a conference in other services:
-
To invite all members of a certain TeamChat mobile group, click
 > Create new Conference (see How to chat).
 -
Right-click the Instant messaging contact and select Start Conferences from the context menu (see Chat)
To organize a conference, enter the name and select the options you want to enable. Click Start . If you enable microphone, camera or recording, they are active right at the beginning of the conference. If you enable the Lobby, the attendees can join your conference only upon receiving the approval of the moderator. You can also set the password protection to join the conference.
/Start Meeting_4_1_353x504.png)
Figure. Meet now.
Conference screen
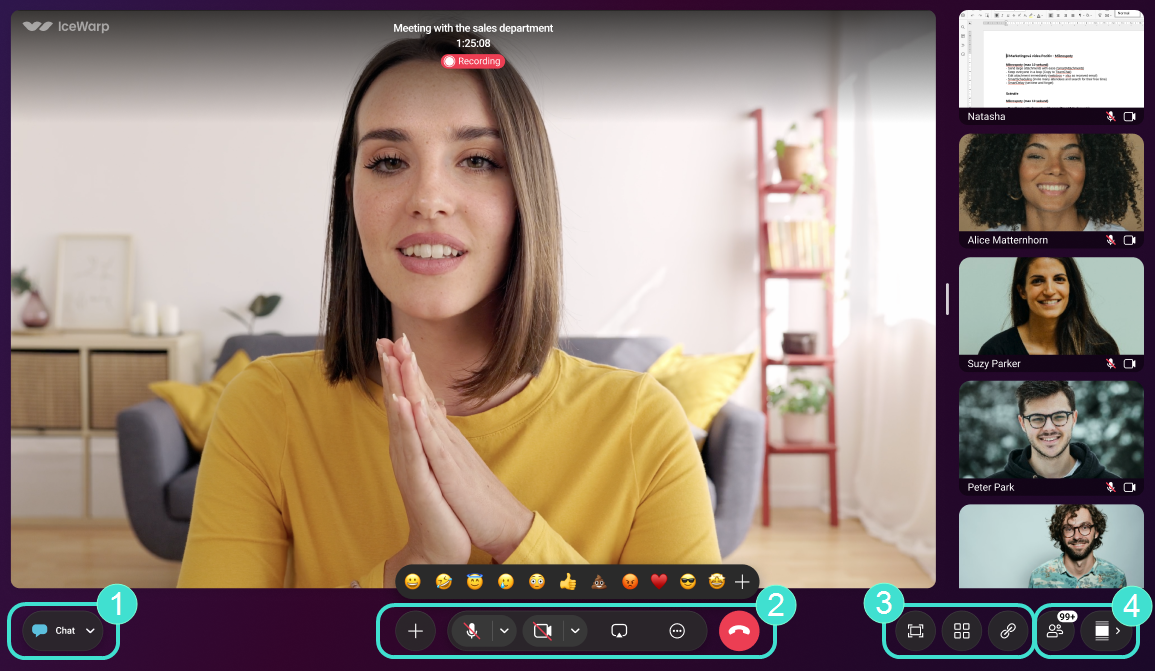
The conference screen allows you to manage your camera and microphone, change the layout of the thumbnails with the screens of your colleagues, open the chat, create a poll, send an emoji reaction, share your screen or record a meeting.

Figure. Conference dialog.
![]() Chat section
Chat section
Send and receive messages from conference attendees seamlessly. Attendees in the lobby can reach out to the moderator via chat, the messages appear in the conference chat window. The private messages are managed within this chat system as well. To be able to fully express yourself, you can create polls, use emojis and attach pictures and gifs.
![]() Options section
Options section
-
 Copy a link of the conference and send it to the people you want to invite in.
 -
Share and edit documents during the conference session. You can select the files located in the WebClient and enable the edit by other attendees.
-
Raise/Lower your hand.
-
Create a poll.
-
 Send an emoji reaction. Select an emoji and attach the text.
 -
Mute/Unmute microphone, speaker and microphone settings.
-
Start/Stop camera and camera settings.
-
Share your screen. You can share the entire screen or separate application windows. Other participants can see the shared screen in the central part of their meeting dialogs.
-
 Start recording.
 -
Enable lobby mode.
-
Change virtual backgrounds.
-
View keyboard shortcuts.
-
 Conference settings.
 -
Leave session / Hang up.
![]() Layout options
Layout options
-
Full screen
-
Layouts
To share the conference link with your colleagues, click Copy link
![]() Manage
Manage
In this section you can manage all invited users in the conference. The users are divided into three categories based on presence - in room, not joined, waiting room / in lobby. Last tab is used for moderation. The moderator can moderate individual users via checkboxes.
A moderator can:
-
Grant moderator rights
-
Mute participants
-
Stop video of the participants
-
Pin participants to the stage
-
Kick participants out from the conference
-
Send a private message
User in a lobby can be:
-
Approved
-
Rejected
Moderation:
-
Mute the audio for everyone
-
Block the audio for everyone
-
Switch off the video for everyone
-
Block the video for everyone
To hide the avatars of the participants, click Show / Hide thumbnails.
Note: We recommend to start an online meeting or call only via the secured connection. Google Chrome does not allow to use the microphone over a non-secured session anymore and it is only the matter of time until the other browsers follow.
In Conferences, the ongoing session is marked In progress. Once finished, the conference appears in the History tab.

