IVR
Interactive Voice Response (IVR) is a technology that allows a computer to interact with humans through the use of voice and DTMF (Dual-Tone Multi-Frequency signaling) keypad inputs.
This feature allows you to define automatic directing of callers. They select from offered voice choices and push the appropriate keys.
The text to speech section within the VoIP - Advanced tab allows IVR to generate audio files from textual data on-the-fly.
General
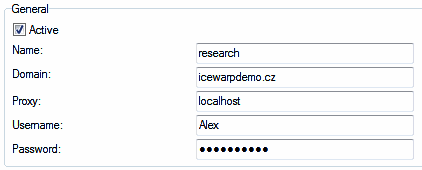
Figure. General section.
| Field |
Description |
|---|---|
|
Active |
Check the box if you want to have this service active. |
|
Name |
Enter a service name. Warning: This name has to be unique. |
|
Domain |
Fill in the name of domain where the account created for this purpose exists. Note: It is also possible to use a user defined under the Devices tab. In this case, it is not necessary (and even possible) to specify this field. |
|
Proxy |
Fill in the IP address of the server where SIP (VoIP) service is running. Default value and mostly used one is 127.0.0.1. Warning: The <proxy,username> pair has to be unique. |
|
Username/Password |
Fill in the credentials of the auto attendant account. This account can be defined within one of the server domains (only for this reason) or under the Devices tab. Note: IVR is another Java service. It needs to connect to the SIP server (just like Echo and Voicemail). For this reason there must be an account for IVR and IVR needs to know what account to connect to. This user (his/her number or email) is called. The root rule is executed first, then other rules/actions as defined. |
Profiles
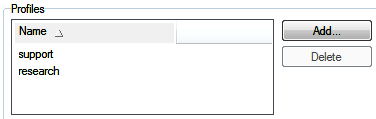
Figure. IVR Profiles section.
Section(s)

Figure. IVR Sections section.
| Field |
Description |
|---|---|
|
Add |
Click the button to add a new routing. The Auto Attendant Routing dialog is shown. |
|
Edit |
Select a routing and click the button to edit properties of this routing. The Auto Attendant Routing dialog is shown. See the Type - Text to speech field bellow. |
|
Copy |
Select a routing and click the button to open the Auto Attendant Routing dialog. You can add a similar routing using this button. See the Type - Text to speech field bellow. |
|
Delete |
Select a routing and click the button to delete it. |
|
Arrows |
Select a routing and move it up or down in the list using these buttons. |
|
Test |
Click the button to have a phone dial pad shown. This is the way how to test defined rules. Tip: Test starts on the selected row. It is not necessary to go always through all defined rules. |
|
Export Graph |
Click the button to export a graph of your IVR rules. The .gv format is used (supported by Graphviz). |
IVR Rules Dialog
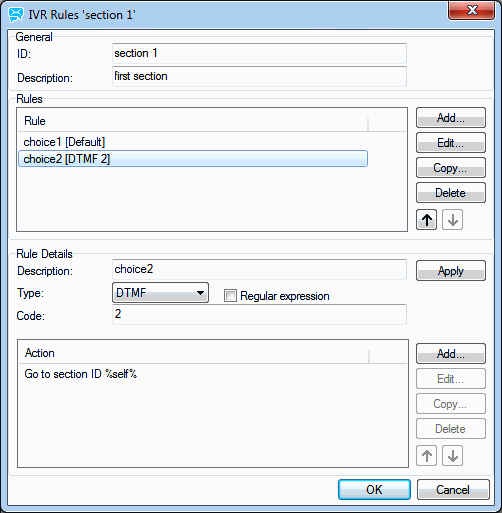
Figure. IVR rule.
General
| Field |
Description |
|---|---|
|
ID |
Fill in a routing name. |
|
Description |
Fill in a short descriptive text. |
| Rules |
|
|
Add |
Click the button to add a new rule. |
|
Edit |
Select a rule record and click the button to enable editing. |
|
Copy |
Select a rule and click the button to copy it. This allows you to add a similar rule. |
|
Delete |
Select a rule and click the button to remove this rule. |
|
Arrows |
Select a rule and use arrows to move this rule up/down in the list. |
Rules
| Field |
Description |
|---|---|
|
Add |
Click the button to add a new rule. |
|
Edit |
Select a rule record and click the button to enable editing. |
|
Copy |
Select a rule and click the button to copy it. This allows you to add a similar rule. |
|
Delete |
Select a rule and click the button to remove this rule. |
|
Arrows |
Select a rule and use arrows to move this rule up/down in the list. |
Rule details
| Field |
Description |
|---|---|
|
Description |
Fill in a short descriptive text. |
|
Type |
Select from the list:
Regex expressions can be used (Check the box) - see the example below. |
|
Code |
Fill in a value:
|
|
Add |
Click the button to add a new action. The Rule Action dialog opens. |
|
Edit |
Select an action record and click the button to enable editing. |
|
Copy |
Select an action and click the button to copy it. This allows you to add a similar action. |
|
Delete |
Select an action and click the button to remove this action. |
|
Arrows |
Select an action and use arrows to move this action up/down in the list. |
|
OK |
Click the button to add a rule or save its changes. |
Rule Action Dialog
This dialog changes according to the Type option selected:

Figure. Rule Action dialog.
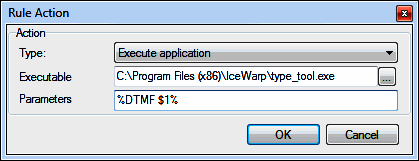
Figure. Regex example.
Text to Speech Engine Change
To change a text to speech engine (in Windows), do the following:
- Run the cmd.exe tool under a local system account.
-
Within cmd.exe, use the time command.
You will obtain something like this: The current time is: 16:29:06.96 Enter the new time.
Select Ctrl + C.
-
Use the at 16:30/interactive cmd.exe command.
You will obtain the Added a new job with job ID = 1 message.
-
Within cmd.exe (running under your local system account) run the following command:
"C:\WINDOWS\system32\rundll32.exe" C:\WINDOWS\system32\shell32.dll,Control_RunDLL "C:\Program Files\Common Files\Microsoft Shared\Speech\sapi.cpl",Speech
-
The Speach Properties dialog - Text to Speech tab opens. Select your desired text to speech engine from the Voice selection list. (Click OK.)
There are several ways how to do it. One of them is to schedule it:

