General
On-server Setup

Figure. General section.
Warning: Access mode to the service can be set on both
domain and user levels. See the appropriate places ([domain] – Policies, [user] – Policies).
This note applies only to sharing of groupware items. All
users can work with their own contacts, calendars, etc. without
restrictions.

Figure. Notification section.

Figure. GAL Synchronization section.

Figure. Button bar.
| Field |
Description |
|---|---|
|
Start |
Click the button to start the GroupWare module. See the System Node – Services – General tab. |
|
Stop |
Click the button to stop the GroupWare module. See the System Node – Services – General tab. |
|
Backup Data |
Click this button to backup an account. The Select Item dialog (see the User Groups – Creating the Resource section) will open, here you can select the account or domain to be backed up. Choose the account and click the Select Account button. A standard file browser will open allowing you to choose the destination folder for the backup. |
|
Restore Data |
Click this button to restore an account. A standard file browser will open allowing you to select the appropriate backup file to be used for this restore. The restored account (or domain) is not selected as this information is included in the backup file. Note: Restore errors can occur when trying to restore groupware data that already exist – e.g. groupware items within the Trash folder(s) of the appropriate account(s). See the following text to avoid/ deal with this situation. There are two ways how to restore data: Warning: Before you delete anything from your database, backup it! Do not perform any irreversible commands unless you are sure what you are going to do.
To show event type items remaining in the Trash folder, you can use this query: SELECT Event.* FROM EventGroup, EventOwner, Event WHERE Own_Email = 'chi@test.com' AND OWN_ID = GRPOWN_ID AND EVNGRP_ID = GRP_ID and EvnFolder='@@trash@@' Replace chi@test.com >with the wished email. To show contact type items remaining in the Trash folder, you can use this query: SELECT ContactItem.* FROM EventGroup, EventOwner, ContactItem WHERE Own_Email = 'chi@test.com' AND OWN_ID = GRPOWN_ID AND ITMGRP_ID = GRP_ID and itmFolder='@@trash@@' Replace chi@test.com with the wished email. To delete these groupware items from the Trash folder, replace SELECT with DELETE. Warning: The second way is recommended only as an emergency solution. The query clears items only from master tables leaving many orphans in the database. |
|
Restore From DB |
This feature allows you to restore only one user, group or domain from your backed up database and leave the currently running database intact. Click the button to open the Database Settings dialog where you can select the appropriate user, group, domain. For detail description of this dialog, refer to the Shared Topics – Database Settings. Note: The dialog opened here is slightly different – the Backup Connection section plus some buttons are missing. |
|
Delete Data |
Click this button to delete all data for a specific account. The Select Item dialog will open to allow you to choose the account or domain whose data is to be deleted. |
|
Rename Folders |
Click the button to rename default groupware folders for either single users or whole domains. The Rename Default Folders dialog opens. You may want to rename folders e. g. because of localization after upgrade from an older version where localizations were performed by WebClient. Note: You can rename also default WebClient folders here. |
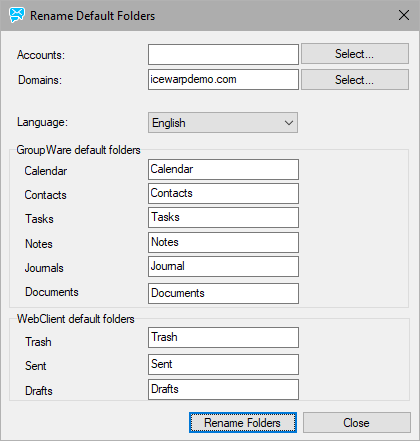
Figure. Rename Default Folders dialog.
| Field |
Description |
|---|---|
|
Accounts |
Fill in accounts (email addresses) that you want to rename folders for. You can use the Select button to open the Select Item dialog. |
|
Domains |
Fill in domains that you want to rename folders for. You can use the Select button to open the Select Item dialog. |
|
Language |
Select the language you want to use for folder names. Names in this language are pre-filled into the Events, Contacts , etc. fields where they can be changed. |
|
GW default folders |
Rename groupware folders here. |
|
WebClient default folders |
Check and eventually rename WebClient folders here. |
|
Rename Folders |
Click the button to perform changes. The dialog stays open for other possible changes. |
|
Close |
Click the button to close the dialog. |

