Reports
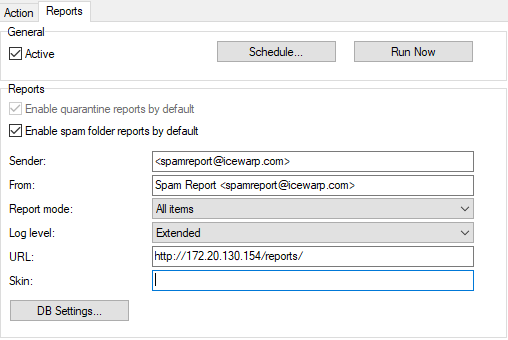
Figure. Reports tab.
| Field |
Description |
|---|---|
|
Active |
Check the box to activate Antispam reports. |
|
Schedule |
Click this button to define a schedule for sending quarantine reports. A simple dialog is opened allowing you to pick a schedule. |
|
Run Now |
Click this button to run spam reports immediately. |
|
Enable quarantine reports |
Check this box to have quarantine report emails sent to your users. |
|
Enable spam folder reports |
Check this box to have spam folder reports sent to your users. |
|
Sender |
Enter the sender you wish the reports to be sent from. This should be something meaningful - i.e. some valid email address. |
|
From |
Enter the From header information you wish to appear in the reports. |
|
Report Mode |
Choose one of the following:
Note: Since version 12.1 it is possible to force mode (quarantine, spam) in GET parameter when launching manually via URL. Report can be forced to show only spam or quarantine by GET parameter "report_type" set to value "spam" or "quarantine". |
|
Log level |
Select a level of Antispam logs:
Note: It is strongly recommended to have the level set to Summary and select the Debug level only if you need to debug. After this debug, the level is to be set back to Summary (or None). If you choose debug reports, someone can call it remotely and see all addresses. For detailed information, refer to the warning (with an exclamation mark icon) at the end of this chapter. |
|
URL |
Enter the URL of the confirmation page on the IceWarp Server. You should specify the port that IceWarp Server uses if it is not the standard (port 80). If you have a multi-domain server, you should use the system variable %%Recipient_Domain%% like so http://%%Recipient_Domain%%:32000/reports/ The above setting says to use the domain of the email recipient, on port 32000, so for an email to john@icewarpdemo.com it will read http://icewarpdemo.com:32000/reports Note: The IceWarp Server Web service must be running for this function to work. |
|
DB Settings |
Click the button to open the Database dialog. Here you can set a database for Antispam reports. For more details, refer to the Shared Topics – Database Settings chapter. |
Note: Antispam reports are launched via Web service. For Antispam report explanation, refer to the Example - Antispam Report Log.
There are three variables related to spam reports:
SpamLang: specifies the language of spam reports
SpamReportsDateFormat: specifies the date format that spam reports will use
SpamReportsTimeFormat: specifies the time format that spam reports will use
They can be edited by API Console.
The appropriate formats are explained at http://cz2.php.net/manual/en/function.date.php.
How to Set Antispam Reports
- Enabling reports
Navigate to the Antispam – Action node – Action tab – Spam section and set the Default spam folder mode field to Use spam folder.
Navigate to the Antispam – Action node – Reports tab, enable reports (Check the boxes), set the Schedule, Sender, From header, Report mode and URL.
Figure. Enabling reports.
- Specifying users/domains that will use reports
Now, reports are enabled for all users on your server, if you want to use reports only for certain users or domains, you need to change settings on the user level.
Navigate to the Management – <domain> – <user> – Antispam Section and set Spam reports mode and Spam folder mode. (For more information, refer to the F1 help for this tab.)
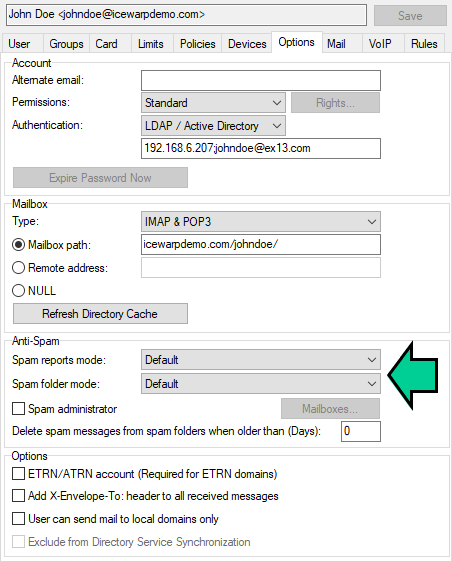
Figure. Specifying users.
- Using tool.exe
However you can use GUI to change settings, it is not convenient to set it for all domains/users manually.
Therefore you can set these settings using this tool. Start the built in File Manager (click its icon within the GUI tool bar or press CTRL+SHIFT+F) and use the command line to run commands.
Where x means:
0 – Disabled
1 – Default
2 – New Items only
3 – All items
Examples:
You want to use reports, but you want to exclude some domain(s).
If you follow step #1, all users will receive reports. You may want to exclude some domain/s:
Replace <domain> with the appropriate domain name.
Other option is to create the bypass.dat file in the spam/reports/ folder. This file should contain a list of domains that will be bypassed during processing of reports. This is very important for backup domains as these do not have users. It is recommended to use bypass only for backup domain. Use a single row for each domain name.
You want to use reports only for one domain.
The easiest way how to achieve it is to disable reports for all and then enable reports for the domain you want.
This will disable reports for all users (this may take a while depending on a number of users on your server).
Now enable reports for domain / users you want:
Note: Default means settings on the Antispam – Action node – Reports tab.
You want to use different report type per some domain(s).
You may want to use the All items mode for some domains and the New items one for others. Steps depend on the number of domains using one these modes. Should 80% of domains use All items, the easier way is to set All items as the default mode (see step #1) and change the mode for the rest of domains.
Different Report Schedules
Note: For backup domains, only quarantine reports are sent. If you want to have even spam reports sent, set spam message score (Antispam – Action – Action tab - Score required to classify message as spam) equal or lover than Score required to quarantine message (the same tab).
Users that have accounts only within backup domains can access their quarantine queues without necessity to wait for reports. They have to:
Insert the following address into a browser address field: <icewarp_server_hostname>/admin/index.html?view=gateway_login
Fill in the Email Address and Captcha fields.
Follow the shown link to their current quarantines. The link is sent by email to the appropriate mail box.
You may want to set a different report schedule for some users or domains. To set it, do the following:
- Create the bypass.dat file and insert it into the <InstallDirectory>/spam/reports folder.
- Into this file, insert users and/or domains you want to bypass - one per line.
Syntax for users is: <user's_email_address>
Syntax for domains is:<domain>
Example:
john.doe@domain.com
alison.w@domain.com
domain2.com
This will exclude these users/domain(s) from a general spam report schedule.
- Create a new task (System > Tools > Tasks/Events).
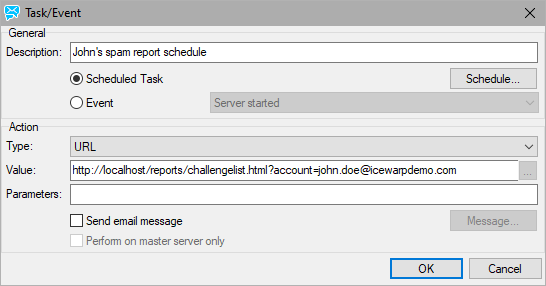
Figure. Creating new task.
Click the Schedule button and set the wished individual schedule.
In the Type field, select the URL option. Enter the appropriate URL into the Executable field.
Syntax is:
for users: http://localhost/reports/challengelist.html?account=<user's_email_address>
example: http://localhost/reports/challengelist.html?account=john.doe@domain.com
for domains: http://localhost/reports/challengelist.html?domain=<domain>
example: http://localhost/reports/challengelist.html?domain=domain2.com
Do not forget to Check the Perform on the master server only box.
Note: To obtain report details using this executable, use API console to set the following variables to the appropriate values: SpamReportsDebugLevel=1, SpamReportsLogLevel=4.
Warning: Reports URL can be executed by anyone, even remote users (and your user's emails could be seen). To prevent this, either change both SpamReports* variables back to 0 (immediately after troubleshooting is done) or protect reports so they can be executed only within your server.
You may restrict access to the report script file on Web server (the Web Site dialog – Access tab) to localhost only:
URI = /reports/challengelist.html*
IP = NOT 127.0.0.1
ACCESS = DENY
Debug logging consumes an unnecessary amount of resources.
Note: The timeout for spam reports is 32 minutes (1920 seconds), usually more then enough. If you notice timeouts in phperror.log (<install_dir>/logs) while debugging spam reports, you can increase max_execution_time in php.ini (install_dir>/php) and also php.user.ini – if used – so that such setting is preserved on upgrades.
Warning: If you execute custom reports in a task using your external host/IP, such as http://externalip/reports/challengelist.html?account=xxx
Then your external IP needs to be in the rules listing of IPs that are NOT denied. Example: 127.0.0.1;externalIP
If you run customer reports using http://127.0.0.1/reports/challengelist.html?account=xxx, then keeping 127.0.0.1 only in that field is enough.
Details: http://forum.icewarp.com/forum/showthread.php?2702-Task-and-events-Issue.

