Managing Events
Creating events
Events are the basic entries in the calendars. You can add a Standard event or Online meeting.

Figure. Creating event.
-
To create a new calendar event of a certain type, double-click a free slot in your calendar and select:
-
Standard event to organize personal meeting with your colleagues (you can specify location, add participants, a short description, etc.)
-
Online meeting to organize a video conference and share the link to it with the
-
-
To organize Standard event, click a free slot in your calendar, type name of an event and press Enter (you can change it's type later, double-click the event to open it's menu).
-
Once all the necessary details have been entered into Event settings, click Save & Close to finish editing.
A prompt will appear asking whether to send invites to the attendees listed. Click Send invite to close the editor and send invites.
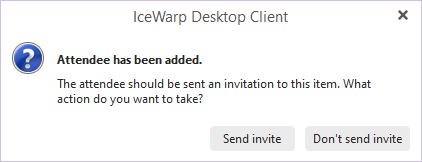
Figure. Sending invites.
-
All attendees will receive an invitation email. They can reply Accepted, Declined, or Tentative. The reply will be displayed in a window next to each attendee's email.
Note: If you delete or edit a created event after sending invites, all attendees will receive a notice about changes.
Note:Google accounts set up in application, will automatically synchronize Google Calendar.
Event settings
Event settings allow to define the basic configuration. Click Show advanced options, to see all available options.
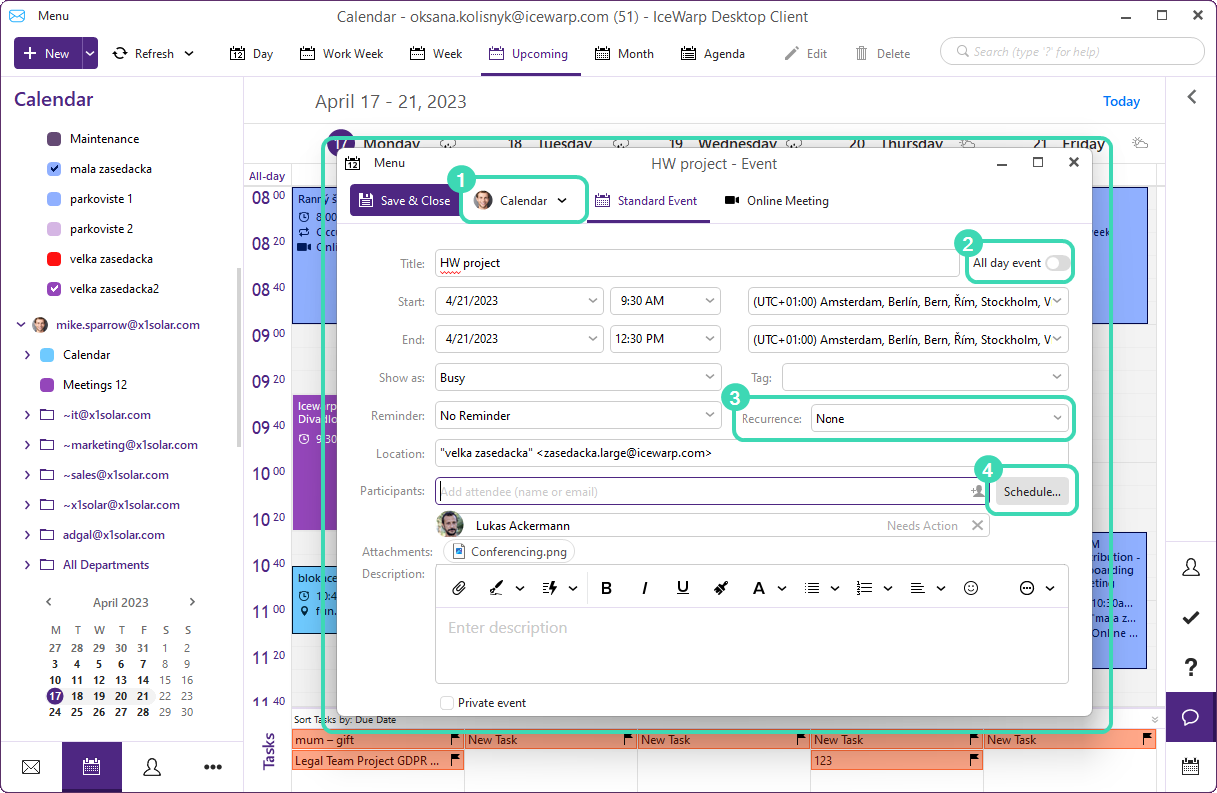
Figure. Event settings.
-
Calendar folder
 . Click to select desired folder from the drop-down list.
 -
Title is the subject of the event. This information will be displayed in the calendar window after the event is saved, therefore it should be as brief as possible.
-
Start is the start time of the event. Consists of two fields, date and hour.
-
End is the end time of the event. If the date part of end time of a given event differs from its start time date, it results in a multiple day event. These events are visible in the upper part of the schedule, under the all day events. This way they don't mess into the daily schedule.
-
If you check the All day event
 checkbox, the start and end time items will be missing. This means that this event will be in progress over the entire day, but other events can be still planned for this day. The typical example is setting entire-day events like anniversaries, symposiums, vacations, business trips, etc.
 -
If you check the Private event checkbox, the event will be visible only to participants.
-
Show as has a drop-down menu with statuses: busy, free, tentative, out of office.
-
Reminder is a special function of the interface, that allows alerting of events. After setting a reminder, a pop-up alert relevant to the upcoming event, appears at the defined time. The default value is No Reminder in the drop-down list. Switching to this option will turn off an existing reminder. For more information about working with reminder see Event Reminders.
-
Tag drop-down menu contains color-coded categories to assign to the selected event. In the calendar's central view, events will be shown according to their colored tags. In case of multiple calendars, each calendar is assigned its own tag. The tag's color will be shown in the event's heading (Except month view layout).
-
Recurrence
 drop-down menu is used to set periodic tasks which take place every given number of days, weeks or months.
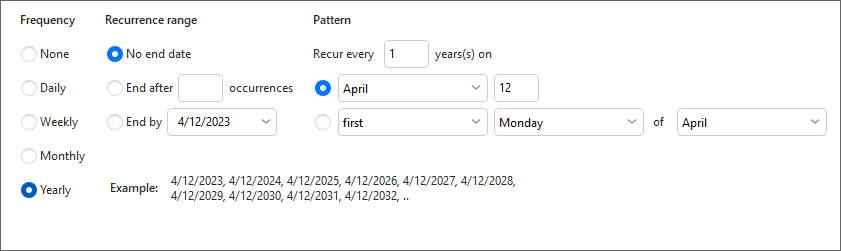
Figure. Recurrence setup.
Recurrence allows to set frequency when the event is repeated and its termination.
-
Frequency: daily, weekly, monthly or yearly.
-
Recurrence range: Set here when the event should end. There are three options:
-
No end date - The event will recur forever
-
End after X occurrences - Set the number X. The event will not recur after X occurrences.
-
End by - Set a date. The event will not recur after this date.
-
-
Pattern:
-
Frequency daily -This pattern sets the number of days when the event should recur,
-
Frequency weekly - This pattern sets the number of weeks when the event should recur. It is also possible to choose the days of the week on which the event should recur
-
Frequency monthly - This pattern sets the number of months when the event should recur. It is also possible set a day (e.g.:set the number of day in month, or set for example "second Monday").
-
Frequency yearly - This pattern sets the number of years when event should recur. It is also possible to set a date for event or set for example "second Monday of February".
-
-
-
Location contains a place of the event. For example: conference rooms or common areas at work, at home, at school
-
Participants are the contacts invited to a particular event and their status is determined by their response to the event request (their status can also be set manually).
-
Attachments. You can attach files to events. Press the clipboard icon to add any files relevant to this contact. (e.g.: images, presentations, document files).
-
Description. To any event it is possible to add a comment referring to various issues such as event details or lists of items related to the event.
-
Location of the event - for example: conference rooms or common areas at work, at home, at school...
-
Scheduling
 allows to see if the proposed time overlaps busy times on the other participants' calendar. There are three possible types of requests to send to each attendee: Required, Optional, and Resource. See below.
Scheduling
Click + Add attendeeand select an attendee from the list of contacts. If you have the Freebusy URL for the contact, you can see the schedule of the attendee, which can help you organize the event.
In All attendees you will see the list of attendees you invited to the event.
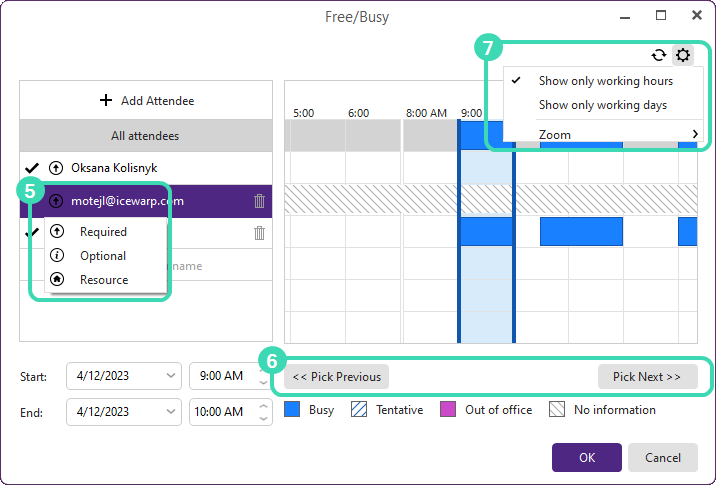
Figure. Scheduling.
-
Type of resource
 . Click
  near an attendee name to select a type of resource Required, Optional, Resource.
 -
Pick Previous and Pick Next
 : displays the time period when all attendees actually have free slots.
 -
Refresh
 : refresh the information about the free time slots of attendees
 -
Options

 : brings up the list of options for scheduling. Choose displaying working hours or days, change the zoom scale.
Rescheduling events
-
To reschedule an event, drag & drop it to another slot.
-
To change duration of an event in the day or week view, point to the frame of an event box and when you see
 , click and drag the frame to a new time.
Note: It is only possible to change the events according to a calendar grid step. To change the grid, go to Calendar Settings (see Calendar View).
See How to reschedule an event.
Deleting events
To delete an event, select an event and press Delete.
Note: Copy, Cut and Paste events using the standard Ctrl+C (Copy), Ctrl+X (Cut) and Ctrl+V (Paste) hot-keys.

